
Course Link: https://app.pluralsight.com/library/courses/getting-started-entity-framework-core/table-of-contents
As someone who has not used Entity Framework very much, starting with Entity Framework Core 3.1 seems like the best place to start, and I didn’t even realize it at first. When I originally wanted to learn more about Entity Framework, I searched the Pluralsight courses for courses related to Entity Framework 6 which my project is currently using, and that way I knew that it would work with .Net Framework. However, funny enough, the intro to the Entity Framework 6 course said to use .Net Core 3.1 since it was usable by all platforms now. This made me excited since I enjoy learning new software tools and trying to implement them into a current solution. So here we are with what I learned from the beginning course for Entity Framework Core 3.1.
What is Entity Framework Core 3.1?
Microsoft’s official data access technology for .Net development. EF Core is an ORM. ORM stands for Object Relational Mapper. Without an ORM, we would have to write a lot of code to transform database results into instances of types in our software. We see these as models in the MVC platform. The ORM also builds the relative SQL for the database calls.
It allows a reduction in redundant tasks which also allows developer productivity to be higher and coding consistency when accessing data.
Typical ORMs will infer that the database tables and mapping are similar while EF has a mapping capability in between that gives a lot more flexibility when mapping objects to tables and properties to table columns.

EF Core 3.0 is considered a “foundation for the future” as Julie Lerman puts it. This means that the updates to EF Core were to tune it up and make it a stable and reliable foundation for future implementation. This also means there are a lot of breaking changes from past versions, these changes can be found here: https://docs.microsoft.com/en-us/ef/core/what-is-new/ef-core-3.x/breaking-changes
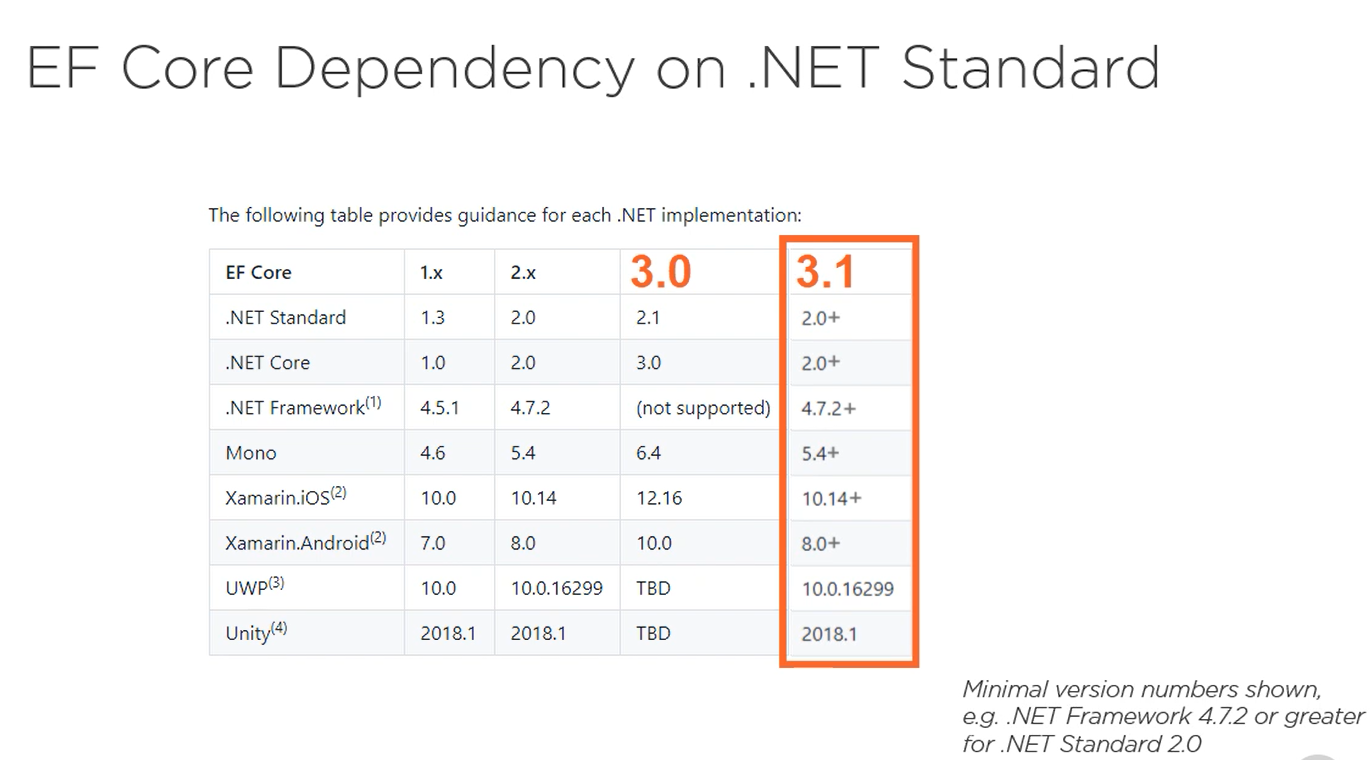
The version to use with EF Core is 3.1, especially if you are using a solution similar to mine that uses .NET Framework. In this image, you can see that the 3.1 version added in support for .NET Framework which is awesome for me.
Installing Entity Framework Core
This is pretty straightforward if you are using Visual Studio. Simply head over to the NuGet Package Manager for the solution and install Entity Framework Core. However, you will see that the package needs an additional package to know how you want to get the data to use in the software. For me, this was using the “EntityFrameworkCore.SqlServer” package and installing version 3.1.
Specifying the Data Provider and Connection String:

Using Migrations
Migrations are a great way to keep your database and your EF Core synced up. Migration is essentially a way to keep the history of the changes made in EF Core and the database as well as create the necessary script code for the changes that are implemented in the models.
Whenever you create new models and add new relationships, you can call the following commands and it will automatically add the necessary code to the migration.
Create a New Migration
- Open the package manager console and make sure to select the project with EF Core installed on it.
- Run the command “
add-migration” followed by a name for the migration file such as “-NewUpdateToTable”. This will create query code for any changes that were made from the previous snapshot. If there are no changes, it will create a default migration file.- “
Add-migration -name:AddNewTableExample”
- “
- From there, you can inspect the auto-generated code and call other commands such as “
update-database” or “script-migration”. You can also add in more code for things such as a view or function.
Revert a New Migration
If you ever need to revert a migration, the process is easy if you have not updated the database or scripted the migration out.
- Open the package manager console and make sure to select the project with EF Core installed on it.
- Run the command “
revert-migration”. There is no need to add the name of the new migration as it will revert the last created migration automatically.
Revert to a Previous Migration
If you ever need to revert to a migration in the past that was not the last created, it will take a couple of extra commands.
- Open the package manager console and make sure to select the project with EF Core installed on it.
- Now there are 2 options,
- If you are using the command “
Update-Database”, you can call “Update-Database -migration: ‘NameOfMigrationBeforeTheMigrationYouAreReverting’”, this will update the database to the state before the migration you are reverting to. - If you are using the “
Script-Migration” command, you can script the migration before the one you want to revert to by using “Script-Migration -’NameOfMigrationToRevertTo’”. Once you run the code, you can continue.
- If you are using the command “
- Finally, you will use the “
Revert-Migration -name:’NameOfMigrationToRevertTo’” - There may be models or classes leftover from the migrations if you used the script-migration path so double check your codebase.
Reverse Engineering Current Database Objects into EF Core
I was new to using EF Core so I had already created most of my tables in the development database before starting the code. I did not want to duplicate my efforts and create a class for each of the tables and go through the work of connecting everything. Fortunately, EF Core had me covered. This is probably not something new but I enjoyed using it to speed up my development time.
For more information and possibly better explanations, make sure to check out Microsoft’s document on reverse engineering your database into EF Core. Here’s how I went about doing it myself:
- Open the package manager console in Visual Studio and make sure to select the project with EF Core installed.
- We will need to execute the command “scaffold-DbContext” but it needs a couple of parameters.
-connection “Data Source = YourDatabaseName; Initial Catalog = YourCatalog”-provider Microsoft.EntityFrameworkCore.SqlServer(I use SQL so that’s the provider I chose)-schema “dbo”(I only wanted a specific schema I was using to be scaffolded)- The final result I used:
scaffold-dbcontext -provider Microsoft.EntityFrameworkCore.SqlServer -connection “Data Source = database; Initial Catalog = catalog; Trusted_Connection = True;” -schema “dbo” - Another Example from Pluralsight’s course:
- After running the command, you can sit back and watch it churn out all the classes necessary.

Visualizing How EF Core Sees Your Model
A simple way to visualize how EF Core interprets the connections you create is by downloading and using a tool called EF Core Power Tools.
In order to use the extension you will have to do the following:
- Make sure the component “DGML Editor” is installed with Visual Studio.
- Download “EF Core Power Tools” extension from the extensions menu.
- Right-click the project where the dbcontext is located and choose “EF Core Power Tools” -> Add DbContext Model Diagram
Now you are able to see a diagram of how EF Core is interpreting your model.
Add EF Core Logging to the Application
EF Core has the ability to track commands that are sent to the database. This can be useful when you want to see exactly what is sent to the database in case EF Core writes a poorly constructed query.
The code to add this is fairly simple and straightforward.
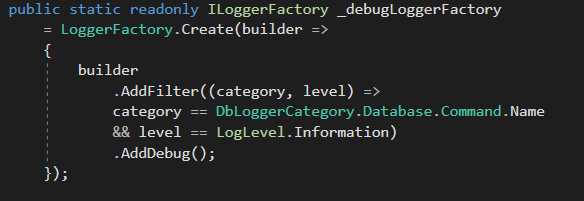
- First, we want to create a logger factory to log the information we want.
- Notice that I created a logger factory that outputs to the debug screen in Visual Studio. In the Pluralsight course, the instructor used ASP.Net Core which used the console. This is flexible and usable in multiple frameworks.
- The category and level exclude things such as stack traces and when connections start. All I want to see are the DB commands.
- Tell the DbContext about the logger. There are 2 ways to do this.
- The first is by putting it directly into the DbContext “OnConfiguring” function.
- From the Pluralsight course, this is an example of the DbContextOptionsBuilder getting created in the DbContext itself. We use the EnableSensitiveDataLogging() in order to see incoming parameterized values.
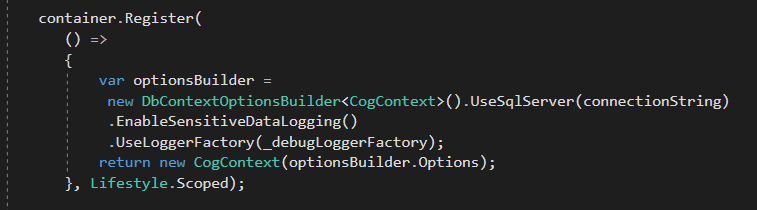
- The second is through dependency injection and adding the logger to the injected DbContext. This is the route I took. In the project, I use SimpleInjector.
- This creates a DbContextOptionsBuilders and sets it to be registered for the injection.
- The first is by putting it directly into the DbContext “OnConfiguring” function.

Selecting Data
Selecting data is fairly simple in Entity Framework Core especially if you are familiar with LINQ.
An example of commands for selecting is here:
- Selecting a table:
dbContext.tableName.FirstOrDefault(); - Using the Where Attribute:
dbContext.tableName.Where(x => x.tableRow == value).FirstOrDefault(); - Selecting a single item or value:
dbContext.tableName.Select(x => x.columnName).FirstOrDefault();
Selecting Views
Something I learned was that it can be pretty easy to select a view the same way as you would select a table. For example, normally if I want to select a table, I have it added in the DBContext and then do a command like dbContext.tableName.FirstOrDefault();
With a view, I can do the same thing but there is a little bit of a change when setting it up in the DatabaseContext.
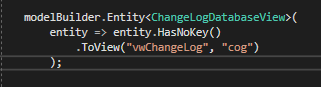
Here is an example of what it would look like to add a view to the context. In the example, `ChangeLogDatabaseView` is the class that will be called when I want the data. Here, I am telling the modelBuilder that when I call the class, I want it to point to the view I specify in the builder. I also make sure to have it say “HasNoKey()”, otherwise, it will want to create a table with a key.

If set up properly, I can call dbContext.ChangeLog.FirstOrDefault(); and it will return the view data.
Inserting Data
This is how I learned to insert data using entity framework core.
The way I have it set up, I first need to get the data to insert from a form or other input. Then, we want to make that data get added into an instance of a class that is in the database context.
For example, if we had been adding a new user to a People class. The People class might have a FirstName field, LastName, and Title.
var people = new People();people.FirstName == “Mason”;people.LastName == “Tope”;
dbContext.Add(people);dbContext.SaveChanges();
Once that code has been called, EF Core will insert the record into the database. This can work with multiple objects as well as you would just need to add more objects to the dbContext.
Updating Data
Updating data has a couple of steps to it. The first thing we want to do is grab the current data from the database that we want to update and make sure to enumerate the data.
var dataToUpdate = dbContext.People.Where(x => x.FirstName == “Mason”).ToList(); The reason we want to make sure to grab the data in memory through a list is that when updating, we can do the updates to the list and then push the updates all at once whereas if you leave it as IQueryable, it will select and update multiple times. It’s not as big a deal if there are not many updates, but for batch updates, it’s a lot fewer data calls to the database.
Next, let’s update the data in our list. We will update a field to list any people named “Mason” to have a title as “The Awesome.” (So then it will be “The Awesome Mason” 😉 )
dataToUpdate.ForEach(x => x.Title == “The Awesome”);Finally, once we have the changes we want, we will call the save changes function.
dbContext.SaveChanges();A question that comes up when doing updates through entity framework core is regarding how batch updates work. I believe in previous versions of Entity Framework Core there was specific code you had to write in order for the batch to work properly.
In this version, it will automatically create a batch update if there are more than 4 records that need to be updated. With 4 or less, it will send a SQL command for each one.
Delete Data Using Entity Framework Core
First, we will select the data we want to delete from the database using one of the above select commands.
For example:
var dataToDelete = dbContext.People.Where(x => x.FirstName != “Mason”)Next, use the following code to remove 1 object.
dbContext.Remove(dataToDelete);dbContext.SaveChangesAsync();If you need to delete multiple records at once, use:
dbContext.RemoveRange(dataToDelete);Creating Views with Entity Framework Core
There are a couple of steps for using views in EF Core. It’s straightforward once you create your first one.
- First, if you would like to keep migration history, then run the command
add-migrationfollowed by a name for a new migration. I’ll call mine “AddNewView”.- If you don’t wish to use the migrations, you can skip to #3.
- Inside the new migration, you will need to add the SQL code for the view by writing:
migrationBuild.sql(@“CREATE OR ALTER dbo.NewView
AS
SELECT …”);- After you write the SQL, make sure in the “Down” function to write the “Drop View” code such as this:
migrationBuilder.sql(“DROP VIEW dbo.NewView”)- The reason we add the drop code is if we ever need to go back a migration, this will allow you to either script the SQL easily or let EF Core do the regression itself.
- After you write the SQL, make sure in the “Down” function to write the “Drop View” code such as this:
- Thirdly, we will need to make a new class file to hold the view. Make sure to add the exact number of fields in the class that is going to be in the database view.
- Then, in the context file, we will add in the connection between the new class object and the database view.
public virtual DbSet<NewViewClass> NewView{ get; set; }- We will need to make sure to add that this view does not need a key so that EF Core will not attempt to create it as a table in migration scripts. Here is the code to do that:
modelBuilder.Entity<NewViewClass>(
entity => entity.ToView("nameOfViewInDatabase", "dbo").HasNoKey()
);
Using Stored Procedures with Entity Framework Core
You can use a stored procedure in EF core in two ways:
DBset<Class>.FromSql(“”);dbContext.database.ExecSqlRaw();
Keep in mind when using entity framework core and stored procedures:
- The stored procedure must return all the columns of the table or entity.
- The result cannot perform joins to form the result.
- Insert, Update, and Delete procedures cannot be mapped with the entity, meaning you can’t call a stored procedure for the
SaveChanges()function.
Here are a couple of examples with stored procedures using entity framework core.
- Use it to get data from the database into a defined entity:
var dataFromStoredProecdure = dbContext.TableName.FromSql(“EXEC dbo.StoredProecdure”, “Param”);- Run the procedure on its own and return no data:
dbContext.Database.ExecSqlRaw(“EXEC dbo.SqlProcedure”);- Run the procedure with named parameters:
SqlParameters [] sqlParameters = {
new SqlParameter(“@namedParameter”, 1),
};

dbContext.Database.ExecSqlRaw(“Exec dbo.SqlProcedure @namedParameter”, parameters)
Raw SQL
In certain circumstances, there is a need to make your own SQL query rather than let EF core create its own. Some instances may be when you want a certain grouping or if you need to group certain tables in a specific order that a view or stored procedure doesn’t allow.
In any case, EF core has the ability to allow you to create your own query. Of course, keep in mind, the result needs to be able to fill an entity that has been defined.
var dataFromDatabase = dbContext.People.FromSql(“SELECT * FROM dbo.People WHERE Name = ‘Mason’”);You can also use LINQ with this feature as well.
EF Core Commands to Know:
| Package Manager Console | Description |
| add-migration | Creates a new migration for the DbContext to use. This is where to write changes to any database objects that want to be tracked. |
| script-migration | This command creates a script of all the migrations to the specified place. Handy for when making changes for the production database. |
| update-database | This will run the SQL commands in the most recent migrations directly to the database. |
| scaffold-dbContext | This command is useful if you want to bring database objects into EF core if they were created in the database first. |
| remove-migration | Removes the specified migration. Only works if the changes have not already been executed to the server. (If they have, you can reverse them and then run the “remove-migration”. |
Final Thoughts
I hope you learned something from this article if you got this far. I mainly wrote this so that I can make sure this knowledge stays in my brain longer or if I want to quickly find a command or way to write something, I have my own notes to look at here.
I’m still using EF Core in my projects months after learning about this. I’m not sure if it’s better than the old process I used of using SQLConnection and Dapper, but I am enjoying using EF Core nonetheless.
Thanks for reading!